Getting Started
First of all, we need to import the unity package with the asset, if you haven't downloaded yet go here and grab the latest version.
Once everything is imported let's start building out first inspector!
Creating a new Inspector
If you made shader inspectors before you know that we usually inherit from ShaderGUI to build an inspector.
But in our case we will need to inherit from SimpleShaderInspector instead.
SimpleShaderInspector itself is derived from ShaderGUI so Unity will recognize it as a valid shader inspector and assign it to shaders that will ask for it.
Here is an example custom inspector:
using UnityEditor;
using VRLabs.SimpleShaderInspectors;
using VRLabs.SimpleShaderInspectors.Controls;

public class TestShaderInspector : SimpleShaderInspector
{
    protected override void Start()
    {
    }
}
As you can see, there is no OnGUI override, but there is a Start override instead.
The concept of Simple Shader Inspectors is to declare the controls we want to draw and which MaterialProperties they control, and leaving the actual drawing and checking of material property changes to the inspector.
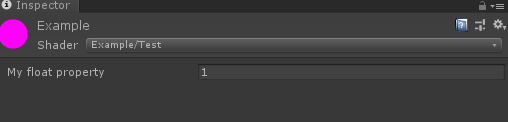
Let's say that we have a MaterialProperty named "_FloatProperty" that we want to display, all we need to do is:
protected override void Start()
{
    this.AddPropertyControl("_FloatProperty");
}
AddPropertyControl is the most basic control available and is comparable to MaterialEditor.ShaderProperty in terms of what it draws to the ui.
Notice the keyword this used at the beginning. if you've done a bit of programming before you should know that normally you can omit it, but in our case is necessary to use it, and if you try to remove it you will encounter a compilation error. Here we explain why we need it, but it's not necessary to know right now.
Localization
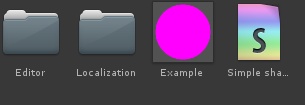
If you try to check how the inspector looks now when you select a material you will notice 2 things:
- It shows the property with its default name.
- Now in your shader's folder you have a
Localizationfolder.
If you go into the Localization folder and then select the folder with the same name of your shader, you see that you have a English.json and a Settings.json file. The latter one is used by the inspector and we can leave that be, what we are interested in is the English.json file.
This file contains all the controls needed text to display and is initially built based on what controls are declared in the inspector.
If we open the one we generated it will only include an entry with 3 strings:
{
    "Properties": [
        {
            "Name": "_FloatProperty",
            "DisplayName": "My float property",
            "Tooltip": "My float property"
        }
    ]
}
As you add more controls into the inspector, more entries will appear here.
By default the Name will be the control alias. This alias depending on the type of control can be either a material property name (if the control has one), or an arbitrary name. In any case you can change an alias by calling Alias(newName).
protected override void Start()
{
    this.AddPropertyControl("_FloatProperty").Alias("MyFloatProperty");
}
Tip
We will talk about .Alias and similarly structured methods here.
After we reopened the inspector again with this change it will update the localization file:
{
    "Properties": [
        {
            "Name": "MyFloatProperty",
            "DisplayName": "My float property",
            "Tooltip": "My float property"
        },
        {
            "Name": "_FloatProperty",
            "DisplayName": "My float property",
            "Tooltip": "My float property"
        }
    ]
}
As you can see the new name entry has been added.
This comes really handy when you have multiple controls that take in the same property, since by default they would use the same entry.
Note
The inspector will never delete old/unused entries to avoid losing stuff that you may need in the future, so is your job to clean up unwanted entries.
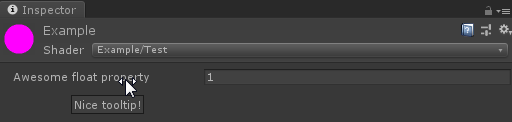
Let's clean up the file and set both DisplayName and Tooltip to what we want to show:
{
    "Properties": [
        {
            "Name": "MyFloatProperty",
            "DisplayName": "Awesome float property",
            "Tooltip": "Nice tooltip!"
        }
    ]
}
Now is time for the fun part, duplicate English.json and rename it to Not english.json and modity it like this:
{
    "Properties": [
        {
            "Name": "MyFloatProperty",
            "DisplayName": "Aledoye flget prodfrghy",
            "Tooltip": "I can't write!"
        }
    ]
}
Now if you reload the inspector you will see this:
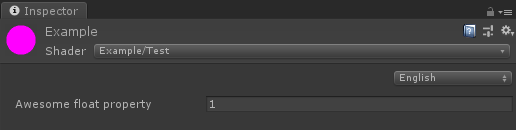
If you select the dropdown that just appeard you will see a new option: Not english.
By selecting that the inspector will immediately swap out the localization with what you have selected.
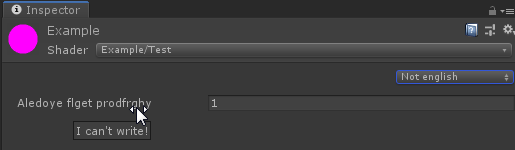
The inspector will keep the selected language until you change it back (that's what Settings.json is used for).
This is really useful in case you want to target multiple countries with your shader and also cleans up the inspector script from having a wall of text with all the label names and tooltips.
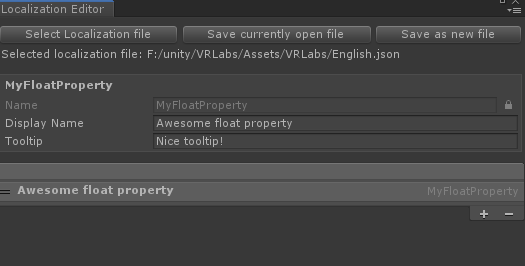
Localization Editor Window
Editing localization files manually can become quite annoying over time, especially when the inspector starts to grow bigger and bigger.
Fortunately, you don't have to edit them manually, but you can use the localization editor window provided by Simple Shader Inspectors. You can find it in VRLabs/Simple Shader Inspectors/Localization file editor.
After you open the window there will be only one button that will prompt you to select the localization file to add, and once opened you will be greeted by a way more manageable UI with a list of the properties available and an area where you can edit the selected one.
Check changes
Now we know how to show a control for a property and how to change its label content, but what about doing something specific in case a property has changed?
Before doing anything, you should really check in the API if there is a control that already does what you want by its own.
In case the answer is no or you simply want to set some values for various reasons you will need to override the CheckChanges method:
protected override void StartChecks(MaterialEditor materialEditor)
{
}
In here you can check if any control had property changes and react accordingly.
Warning
Despite looking really similar to OnGUI you should avoid drawing stuff in here directly.
Right now we do not have any control available globally to check, and also have nothing we can do as a reaction, so let's modify the Start like this:
private PropertyControl _floatControl;
private LabelControl _labelControl;

protected override void Start()
{
    _floatControl = this.AddPropertyControl("_FloatProperty").Alias("MyFloatProperty");
    _labelControl = this.AddLabelControl("MyLabel");
}
{
    "Properties": [
        {
            "Name": "MyLabel",
            "DisplayName": "Awesome label!",
            "Tooltip": "Nice tooltip!"
        },
        {
            "Name": "MyFloatProperty",
            "DisplayName": "Awesome float property",
            "Tooltip": "Nice tooltip!"
        }
    ]
}
Tip
LabelControl is a basic control that just displays a label, the string passed is the Alias used for localization. All controls that do not contain a property will require an Alias.
Now that we assigned those 2 controls to a variable we can check the changes of the first one:
protected override void CheckChanges(MaterialEditor materialEditor)
{
    if (_floatControl.HasPropertyUpdated)
    {
        _labelControl.SetEnabled(_floatControl.Property.floatValue > 1);
    }
}
Here we check if _floatControl had a change and if it had one we set the enabled state of _labelControl to true if the property value is above 1 or false otherwise.
Tip
Almost all controls give you direct access to their MaterialProperty with the Property field. Some controls may give you access to additional MaterialProperty objects they manage. You can see if a control gives you access to additional properties by checking the API.
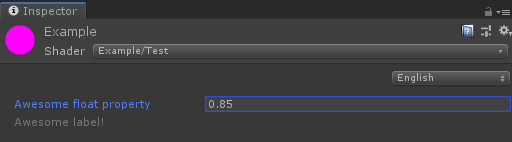
Now we can go back to our inspector and see that now the label gets correctly disabled or enabled based on the value of _floatProperty.
Checks during inspector initialization
Now we can check whenever a property changes value and react conseqently, but it doesn't react during initialization.
The first idea is to do the preliminary checks inside the Start function, but if you already tried that you noticed that whenever you try to access a material property you will get a NullRefereneException.
This is normal, cause while we did initialized controls correctly, the inspector did not have the time to fetch the desired material property yet.
That's where the StartChecks override comes in. This function is still called during the first initialization, but in this phase material properties will have been fetched. So we can put all our needed checks there. You can also put here all checks you want to do only during initialization that require a value from a material property.
protected override void StartChecks(MaterialEditor materialEditor)
{
    _labelControl.SetEnabled(_floatControl.Property.floatValue > 1);
}
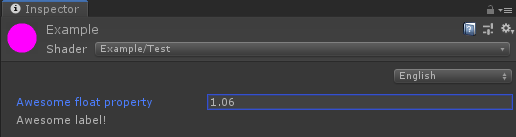
Now the inspector responds correctly during initialization as well.
Finished example class
This is our final result for this first inspector:
using UnityEditor;
using VRLabs.SimpleShaderInspectors;
using VRLabs.SimpleShaderInspectors.Controls;

public class TestShaderInspector : SimpleShaderInspector
{
    private PropertyControl _floatControl;
    private LabelControl _labelControl;

    protected override void Start()
    {
        _floatControl = this.AddPropertyControl("_FloatProperty").Alias("MyFloatProperty");
        _labelControl = this.AddLabelControl("MyLabel");
    }

    protected override void StartChecks(MaterialEditor materialEditor)
    {
        _labelControl.SetEnabled(_floatControl.Property.floatValue > 1);
    }

    protected override void CheckChanges(MaterialEditor materialEditor)
    {
        if (_floatControl.HasPropertyUpdated)
        {
            _labelControl.SetEnabled(_floatControl.Property.floatValue > 1);
        }
    }
}
From here you can continue by adding more controls and checks as you need them.
Tip
In this example we ended up assigning all created controls to local variables, but as you saw in the first steps of the guide you don't need to assign every control to have it shown.